Spring AI: OpenAI Chat Service
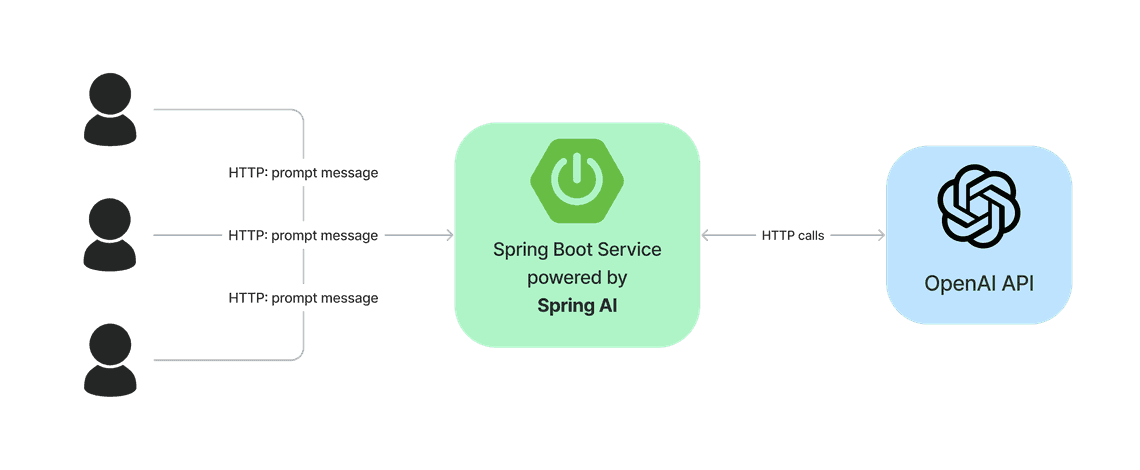
Spring AI is a new project that aims to integrate Spring Boot with AI services. In this article, we will use the OpenAI API to create a simple service that will expose a REST endpoint that will accept a prompt and return the response from the OpenAI API.

In a Nutshell
In a nutshell, we will have to:
- register on the OpenAI website and get the API key
- configure pom.xml file as standard Spring Boot application with Spring AI OpenAI starter
- create a simple controller that will allow us to chat with the AI
Register on the OpenAI website and get the API key
As our service will use the OpenAI API, we need to register on the OpenAI website and get the API key.
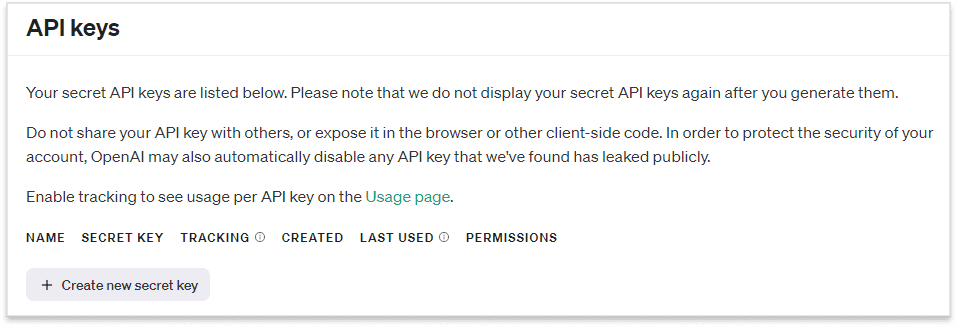
To do that, register on the OpenAI website and then go to the API keys
and create new secret key:
 We will need this key later in the
 application.properties file.
Configuration
We will create a simple Spring Boot application with a standard boot starter parent dependency:
<parent><groupId>org.springframework.boot</groupId><artifactId>spring-boot-starter-parent</artifactId><version>3.2.2</version><relativePath/></parent>
and a web starter dependency:
<dependency><groupId>org.springframework.boot</groupId><artifactId>spring-boot-starter-web</artifactId></dependency>
Now, Spring AI projects has some ready to use starters as well. We will use the OpenAI starter:
<dependency><groupId>org.springframework.ai</groupId><artifactId>spring-ai-openai-spring-boot-starter</artifactId><version>0.8.0-SNAPSHOT</version></dependency>
In order to download the Spring AI dependencies, we need to add the Spring Milestones repository to our pom.xml file:
<repositories><repository><id>spring-milestones</id><name>Spring Milestones</name><url>https://repo.spring.io/milestone</url><snapshots><enabled>false</enabled></snapshots></repository><repository><id>spring-snapshots</id><name>Spring Snapshots</name><url>https://repo.spring.io/snapshot</url><releases><enabled>false</enabled></releases></repository></repositories>
Last but not least, we need to add OpenAI key to the application.properties file:
spring.ai.openai.api-key=[openai-key]
Chat Controller
Once we have covered the configuration part, we can create a simple controller that will allow us to chat with the AI:
@RestControllerpublic class ChatController {private final ChatClient chatClient;@Autowiredpublic ChatController(ChatClient chatClient) {this.chatClient = chatClient;}@GetMapping("/open-ai/generate")public Map generate(@RequestParam(value = "message", defaultValue = "hello") String message) {return Map.of("generation", chatClient.call(message));}}
As you can see, we can sue ready to use ChatClient to call the OpenAI API. The ChatClient is a simple wrapper around the OpenAI API. That’s it! We can now run our application and call the endpoint:
curl http://localhost:8080/open-ai/generate?message=hello
And you should get a reply with a response body that was generated by the OpenAI API:
{"generation": "Hello, how are you?"}
Under the hood
Ok, but what actually happens when you pass a string to the ChatClient? Let’s take a look at the ChatClient implementation.
Input
When it comes to the input, we can pass a string to the ChatClient:
@FunctionalInterfacepublic interface ChatClient extends ModelClient<Prompt, ChatResponse> {default String call(String message) {Prompt prompt = new Prompt(new UserMessage(message));return call(prompt).getResult().getOutput().getContent();}ChatResponse call(Prompt prompt);}
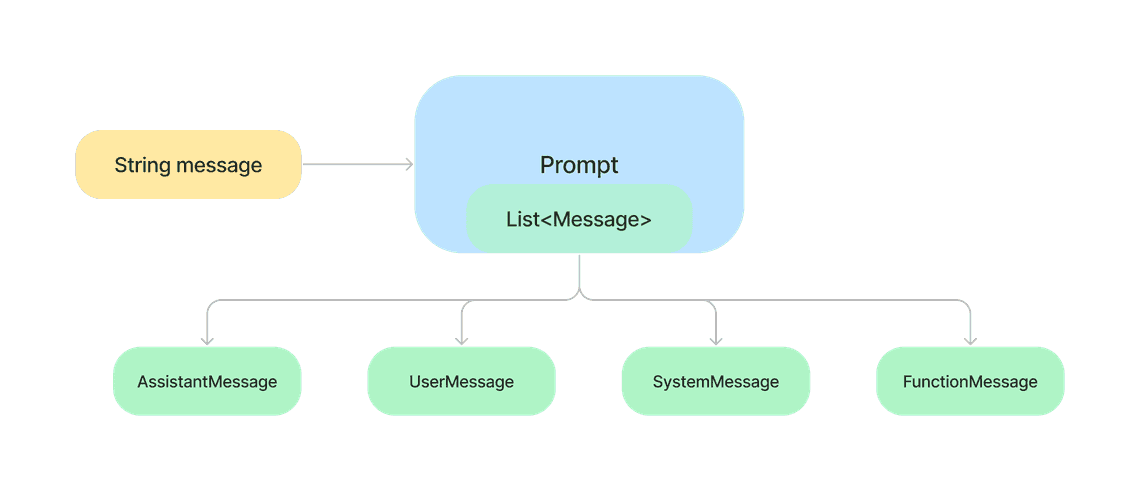
As you can see, the string is wrapped in the Prompt object and passed to the call method. The Prompt object contains a list of messages that we want to pass to the OpenAI API:
public class Prompt {private final List<UserMessage> prompt;public Prompt(UserMessage... prompt) {this.prompt = Arrays.asList(prompt);}public List<UserMessage> getPrompt() {return prompt;}}
A Message from the list can have four different implementations:
AssistantMessageUserMessageSystemMessageFunctionMessage

This is because the OpenAI API accepts the input text. It does not accept simple text, but a
list of messages where each message has assigned a role: assistant, user, system or function.
The OpenAPI API is not in the scope of this article, more about you can read here: OpenAI API text-generation.
Output
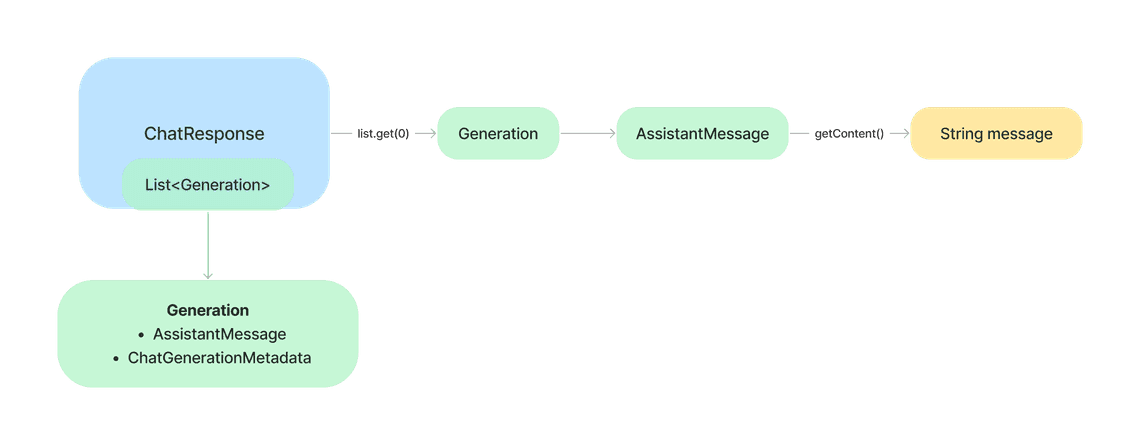
In response ChatClient returns a ChatResponse object which contains a list of Generation objects:
public class ChatResponse {private final List<Generation> generations;public ChatResponse(List<Generation> generations) {this.generations = generations;}public List<Generation> getGenerations() {return generations;}}
Where each Generation object contains simply a AssitantMessage object and a ChatGenerationMetadata object:
public class Generation implements ModelResult<AssistantMessage> {private AssistantMessage assistantMessage;private ChatGenerationMetadata chatGenerationMetadata;public Generation(String text) {this.assistantMessage = new AssistantMessage(text);}public Generation(String text, Map<String, Object> properties) {this.assistantMessage = new AssistantMessage(text, properties);}...}
The AssistantMessage object contains the response from the OpenAI API and was already mentioned in the previous section.
As you can figure out, the assistant role represents the response from the OpenAI API.
In ChatClient we simply return the content of the output of the generation result:
return call(prompt).getResult().getOutput().getContent();
where a getResult() method returns the first Generation object from the list of generations.
getResults().get(0);

Conclusion
To sum up, in this article we have created a simple Spring Boot application that uses the OpenAI API to generate a response based on the input text. We have used the Spring AI OpenAI starter to integrate the OpenAI API with Spring Boot. The starter provides a simple ChatClient that allows us to call the OpenAI API and get the response.
Share
Quick Links
Legal Stuff


